How to Install a Well Pressure Tank Video
Tom Lohr is an avid home DIY enthusiast. He prefers to spend the money he saves on new tools and gardening supplies.
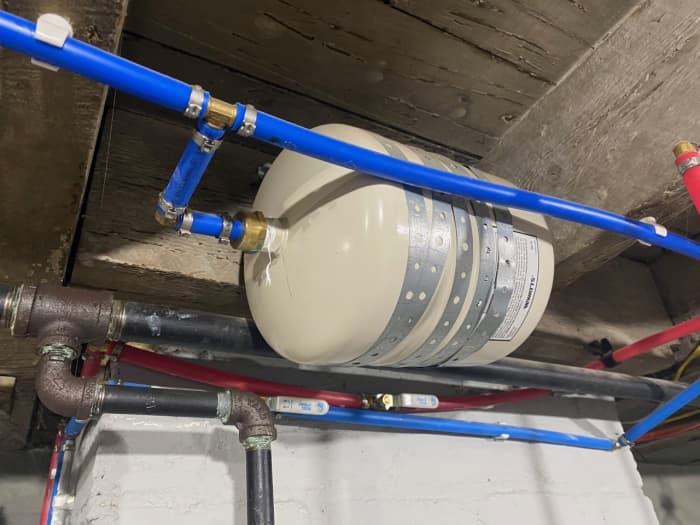
This is a typical expansion tank
Tom Lohr
Prevent Over-Pressurization
Don't let the pressure get to you—or your plumbing.
Excessive water pressure can stress plumbing and lead to expensive and damaging leaks. One would think that water pressure is constant in your household plumbing system, but it isn't. The pressure fluctuates and, to keep it constant and prevent over-pressurization, you need to have an expansion tank attached to your water supply plumbing.
The ideal home water pressure is about 60 PSI. Unfortunately, many city water systems far exceed the recommended maximum pressure of 80 PSI. When I first checked my city-supplied system when I bought a vacant house, it was 125 PSI. That house had also had a water leak in the bathroom that damaged the flooring and the ceiling below it. When I turned the water back on, one of the PEX fittings was spewing out water. It most likely succumbed to years of being subject to excessively high water pressure.
There isn't much you can do about the water pressure being supplied to you. Installing a pressure regulator is really the only solution. And if your pressure is high, you should absolutely install one. A good one (and get a good one) can be had for under $100. They are also easy to install, making it a great DIY project. To test your water pressure, get a cheap pressure gauge that you can screw onto your garden hose spigots. Connect it, turn on the water, and read the pressure. You will probably be surprised.
If you do install a pressure regulator, that would be a good time to install a pressure gauge in your water supply line as well—in line with your plumbing just after the pressure regulator. It's also an easy DIY project, but if you have PEX lines, it is super easy. A decent PEX, push-to-connect pressure guage is inexpensive and will keep you up to date on your system's water pressure.
But even after installing a pressure regulator, your water pressure can become exceedingly high and cause damage. This is because as water heats in your hot water tank, it expands. If it has nowhere to go, it places undue pressure on your plumbing. This didn't use to be a problem. Not that long ago, your house's water was supplied from the city and turned on or off at your home by a valve. That valve was the only thing separating your household system from the city system. If the water in your system expanded, it simply expanded backwards into the city system and the pressure remained constant.
Someone got the wise idea that it was potentially unhealthy for your home's water to be backed up into the city supply system. If your pipes were contaminated, it might get into the city system and contaminate others. The odds of this happening were probably trillions to one, but nonetheless, some clever soul decided this should be prevented. After this decision, homes were supposed to install a backflow preventer, which is a small check valve that only allows water to flow in one direction. They are cheap and easy to install, and you should have one to adhere to plumbing code. The problem is, these backflow preventers also prevent the excess pressure in your system from being relieved by expanding into the city system. The solution: add an expansion tank.
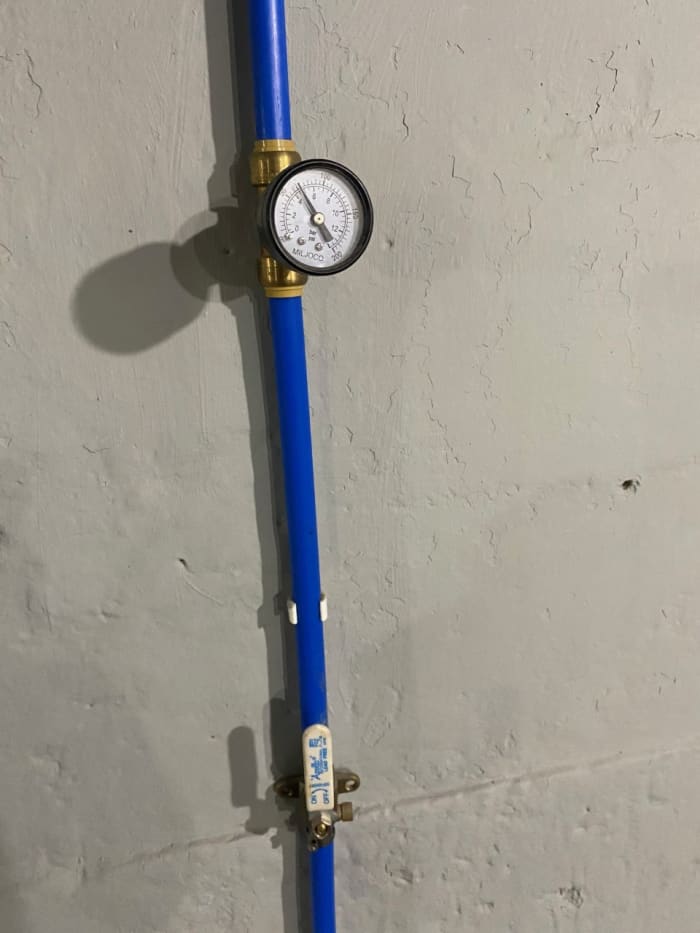
East to install, PEX push to connect water pressure gauge.
Tom Lohr
Expansion Tanks Demystified
You have probably seen an expansion tank on plumbing somewhere. It is a simple, small tank that is usually just above the water heater and is connected to the main system via a branch line. If you don't have one, you need one. You can install it yourself easily, and you will spend around $70 for everything you need.
If you take a shower and use 10 gallons of hot water in a typical 40-gallon hot water heater tank, you need to replace 25% of the heater's capacity. It flows in from the cold water supply on top of the tank automatically, and then your water heater heats it up to the desired temperature. The problem arises from the cold water being heated. The volume of 10 gallons of cold water being supplied to your hot water heater expands when it gets heated to the temperature set on your water heater. Thanks to the backflow preventer, that extra volume has nowhere to go and greatly increases the pressure on your plumbing. That pressure can lead to leaks.
An expansion tank is a small tank that is internally separated into two chambers. The two chambers are separated by a rubber wall. One side of the expansion tank is connected to the cold water supply to your water heater. The other side is a chamber of air that is pressurized to the same level as your home water system pressure. A small valve, like that on a bicycle tire, is on the end of the tank to allow you to pump up that chamber to the exact pressure in your system. Most of them come pre-pressurized at 50 PSI. When the cold water that is being heated by your water heater expands, the increased volume from the heating flows into the expansion tank via a branch line. The excess pressure pushes against the rubber wall. Once your household pressure exceeds the pressure of the air chamber side of the expansion tank, the water pressure on the other side flexes the rubber wall, giving your system extra room. The excess pressure now has someplace to go and your home's water pressure remains constant.
Installing an expansion tank is well worth your time and money for the peace of mind it provides.
1. Make a Plan
At this point, you will have a plan as to how you are going to run a branch line off of your hot water tank cold water supply to the expansion tank. Sketch out a diagram and obtain the correct fittings you will need to run a line from the expansion tank to a tee-fitting that you will be inserting in your cold water supply line. You might only need a tee-fitting and a fitting for the end of the tank if you are lucky. Normally, there are one or more elbow fittings involved. Less is more.
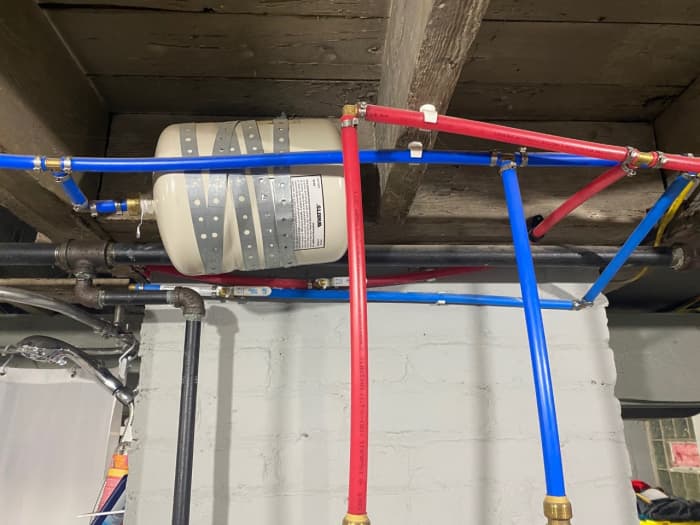
Trust me, this set-up makes sense.
Tom Lohr
2. Choose Your Spot
If you have PEX lines in your home, this project will be much simpler. If you have copper lines, it's a little more complicated but still very doable. You will first need to decide where you are going to mount your expansion tank. It should be mounted as close to the water heater as possible, and above it by at least 18 inches. You might have seen some connected to a copper pipe sticking straight up in the air. This works but isn't recommended. If that copper pipe ever snaps, your basement becomes a swimming pool. Save yourself the hassle, and get a universal expansion tank mount. They fit every tank and will keep yours secure.
3. Acquire the Necessary Hardware
In addition to a tank and tank bracket, you will need a fitting that connects your tank to the size water lines in your home, some teflon tape to make a good connection, and at least a few fittings. I will detail using PEX push to connect fittings. If you have copper you can do one of two things: get all copper fittings and learn to braze them on (not a difficult skill to learn), or you can still buy PEX push to fit fittings since they will also connect to copper pipes as well as PEX. You will have to cut a small section out of your copper pipe cold water supply to insert a PEX tee-fitting, but that is also an easy task. If you have galvanized steel pipes, replace them; seriously.
Read More From Dengarden
4. Prepare Tank and Mount Bracket
Make the task easier by first attaching the connection fitting to the end of the tank, using teflon tape on the threads. The fitting you need is ¾ female on the side that connects to your tank, and your size PEX or copper pipe on the other; usually ½ inch.
Mount the expansion tank bracket. You have to mount it before you can attach the tank. Tip: Make sure that the air valve on the opposite end of the water connection is accessible and has enough room to attach a bicycle pump. If you ever need to change the pressure, you will need to access this. If your water pressure is higher or lower than 50 PSI, pump up the tank or release pressure to match your system's pressure. Get the two pressures as close as possible. Check the pressure and adjust it before mounting the tank.
Notice how the expansion tank is secured to the joists? It works, but a dedicated bracket is neater and does a better job.
Tom Lohr
5. Water Supply and Tank
Turn off the water to your house. Open the lower most faucets to drain the pressure and water out of the water lines. Turn off your hot water heater. Mount the expansion tank to the tank bracket.
6. Add a Tee-Fitting
Place or hold a towel directly below where you will be inserting a tee-fitting into your hot water tank's cold water supply line. There will be some residual water in the lines that will leak out. Cut the supply line at the point that you intend to insert the tee-fitting. Use the tee-fitting to judge how much you will need to cut out of the line to fit the tee. It won't be much. Depending on you how your PEX is run, you may be able to bend it enough so you will not have to cut out a section at all, just a cut in the line.
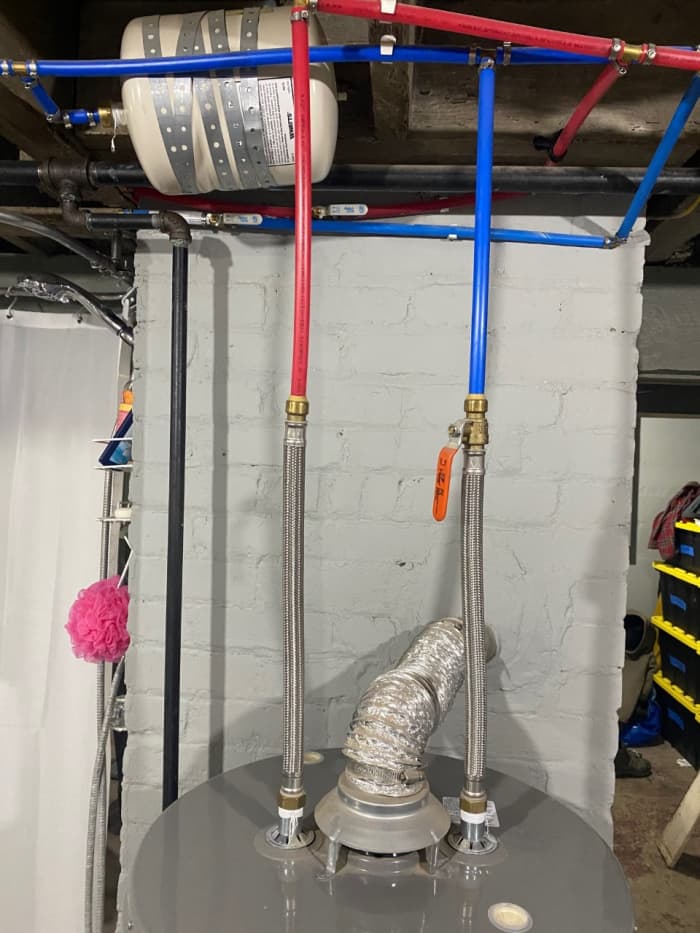
Insert the tee-fitting. Note which way that the line between the tee-fitting and the expansion tank will run. You want to insert the tee-fitting so that the connection to your tank will be facing in that direction. Push, crimp or the two other connections on the tee-fitting.

Tee-fitting connection to tank. An elbow fitting was require to complete the connection.
Tom Lohr
7. Connect Tank to Tee
Cut a piece of PEX to run between the expansion tank and the tee-fitting that you inserted in the hot water tank cold water supply line. If you have other fittings between the two, you will need to cut pieces of PEX to connect those as well.
8. Do a Quality Control Test
Once all of your fittings are connected and you have a complete line running between the tank and the cold water supply, it's time to test for leaks. The faucets you opened to drain out pressure and water should still be open. Slowly open the valve that connects your house to the city water supply. As soon as a steady stream of water is coming out of the faucets, close them. Now check all of the fittings you installed for leaks. If any are leaking, turn off the water supply to your house, drain pressure and water from the lines again using the same faucets and check your new fitting connections. The leaking one will need more pushing to get a better connection, or crimping if you use that type of PEX fitting, or brazing for copper. When you think you have fixed the connection, repeat the turn-on procedure.
9. Restart the Hot Water
Restart your hot water tank.
Pressure Matters
This is an easy DIY project. Your biggest challenge will be mounting the bracket and tank. There never seems to be enough room to make it easy. If you have, or were smart enough to install a pressure gauge as well, check the pressure to ensure it matches what you put in the expansion tank.
Expansion tanks never get the love they deserve. That fluctuating pressure in your water lines will work to loosen fittings and eventually, you will have a leak. You don't want to have to replace a wall or ceiling, and an expansion tank can help prevent that. If you don't have one, now you know what you can do next weekend.
This article is accurate and true to the best of the author's knowledge. Content is for informational or entertainment purposes only and does not substitute for personal counsel or professional advice in business, financial, legal, or technical matters.
Peggy Woods from Houston, Texas on January 11, 2021:
We now have a tankless hot water heater in our home. Your articles are filled with great ideas for those do-it-yourselfers.
Liz Westwood from UK on January 10, 2021:
This is a very helpful and well-written article. It has certainly made me think about checking water pressure. Up to now the only time I do this is when there is a problem with the heating system.
Umesh Chandra Bhatt from Kharghar, Navi Mumbai, India on January 10, 2021:
Very nice. Well explained.
How to Install a Well Pressure Tank Video
Source: https://dengarden.com/home-improvement/How-to-Install-an-Expansion-Tank-in-Your-Plumbing